Photography is more than pointing and clicking. The right setting for the camera transforms ordinary shots into stunning images with crisp details, vibrant colors, and perfect exposure. Whether you are using a DSLR or a mirrorless camera, mastering these settings gives you full control over aperture, shutter speed, ISO, focus, and white balance settings.
For beginners, learning manual camera settings may seem overwhelming. But with the right guidance, you can understand the exposure triangle, adjust for low light, outdoor, or portrait photography, and take professional-quality photos. This article reveals 10 easy camera settings secrets that will help you get amazing results, every time.
Master these 10 easy camera settings secrets to control aperture, shutter speed, ISO, focus, and white balance for sharp, vibrant, and professional-quality photos in any situation.
In this article, we discuss “Settings for Camera.”
What Are Camera Settings?
When you first pick up a camera, you see many buttons and numbers. It feels confusing. However, once you understand the camera’s settings, photography becomes simple and fun. These settings control light, color, and sharpness. In simple words, camera settings tell your camera sensor how to capture the scene.
Many beginners rely on auto mode. That works, but it limits creativity. When you learn camera settings for beginners, you gain control over blur, brightness, and detail. A good camera settings guide helps you take better photos in any situation.
What are the camera settings in photography?
Camera settings are tools that control exposure, depth of field, and motion blur. These include aperture, shutter speed, and ISO, also called the exposure triangle. Learning them helps you get camera settings for sharp photos and professional-looking images.
Why camera settings are important
Good camera settings improve photo quality and reduce image noise. They also improve dynamic range and color accuracy. Once you understand settings, you learn how to improve photo quality and avoid common photography mistakes beginners make.
Exposure Triangle Explained
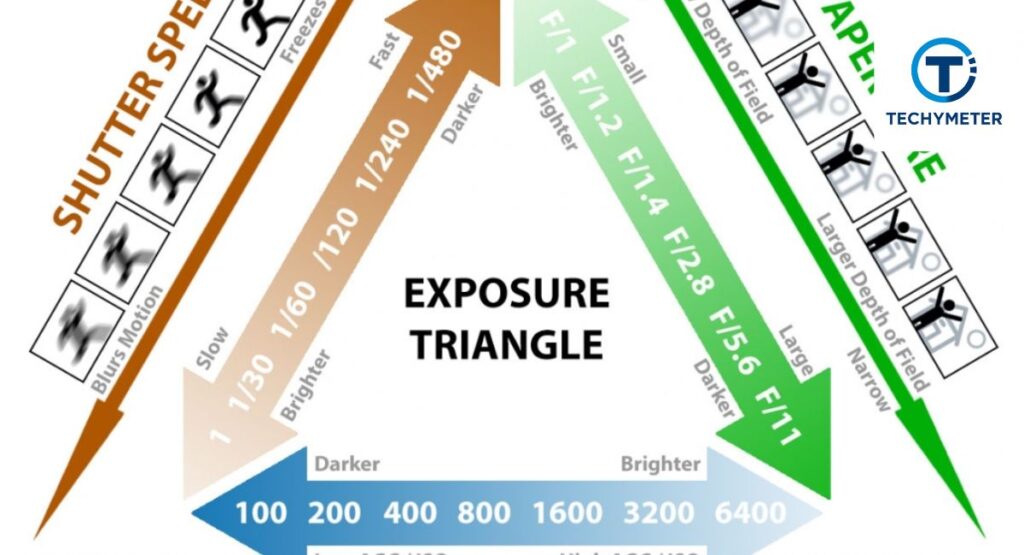
The exposure triangle is the most important concept in photography. It includes aperture, shutter speed, and ISO. These three settings control the light entering the camera. When you change one setting, the other two also change.
Understanding this triangle helps you master manual camera settings. It also teaches how to use manual mode and how light works in photography. Once you learn this, every setting for the camera becomes easier to understand.
What is exposure
Exposure refers to the brightness or darkness of your image. It depends on how much light reaches the camera sensor. Proper exposure keeps details in highlights and shadows and improves sharpness.
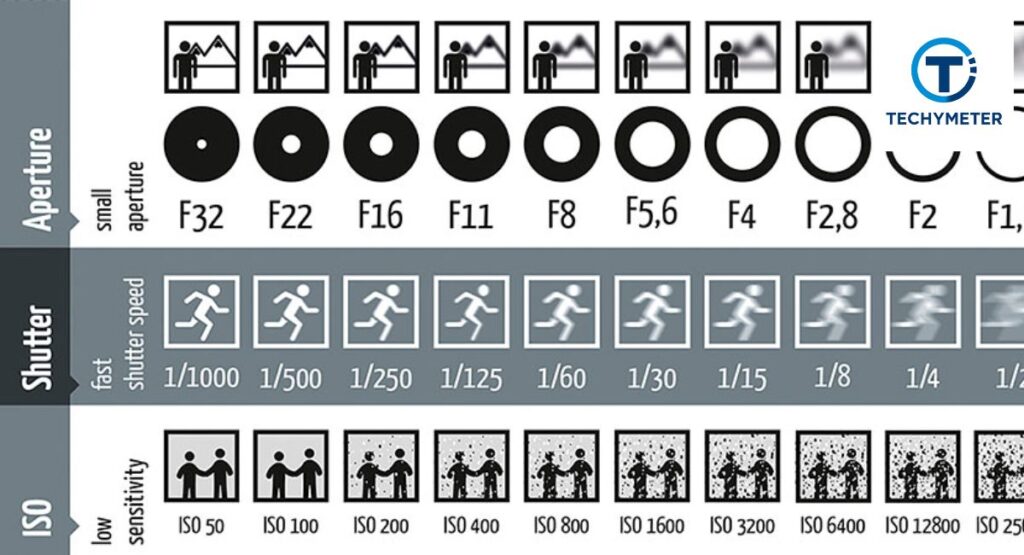
What is aperture
Aperture controls how much light enters the lens. It also controls the depth of field. A wide aperture creates background blur, which helps in getting a blurry background for portraits.
What is shutter speed?
The length of time light strikes the sensor is determined by the shutter speed. Fast speed freezes action. Slow speed creates motion blur, which is useful in creative photography and sports photography settings.
What is ISO
ISO controls ISO sensitivity. Low ISO gives clean images. High ISO is useful in low-light camera settings but can create image noise.
Basic Camera Settings Every Beginner Should Know
Before using manual mode, you must understand basic settings. These include image quality, focus, and white balance settings. These settings improve your image even before you adjust exposure.
Learning these beginner photography settings helps you capture better images. It also improves camera settings for clear pictures and overall photo quality.
Image quality settings
Choosing between RAW and JPEG is important. RAW gives more detail and better dynamic range. JPEG saves space and is ready to use.
White balance settings
White balance controls color temperature. It keeps the white color natural in different lighting conditions.
Focus mode settings
Focus mode controls autofocus. Use single focus for still subjects and continuous focus for moving subjects.
Metering mode settings
Metering mode measures light and helps set the correct exposure. Matrix metering works best for most situations.
Drive mode settings
Drive mode controls how many photos you take per second. Burst mode is useful for action and sports photography settings.
How to Set Up Your Camera for the First Time
When you buy a new camera, proper setup is very important. Correct setup helps you learn how to set the camera manually and improves your settings for camera results from the beginning.
A good setup also prepares your DSLR camera settings or mirrorless camera settings for different photography situations like portraits, landscapes, and low light.
Reset camera settings
Resetting removes old settings. It gives a clean start for beginner photography guide users.
Set RAW or JPEG
Choose RAW if you want editing control. Choose JPEG for quick sharing and a small file size.
Set white balance
Start with auto white balance settings. Change later if the colors look wrong.
Set focus mode
Use autofocus for beginners. It is fast and accurate in most situations.
Set shooting mode
Use aperture priority for beginners or manual mode photography for full control.
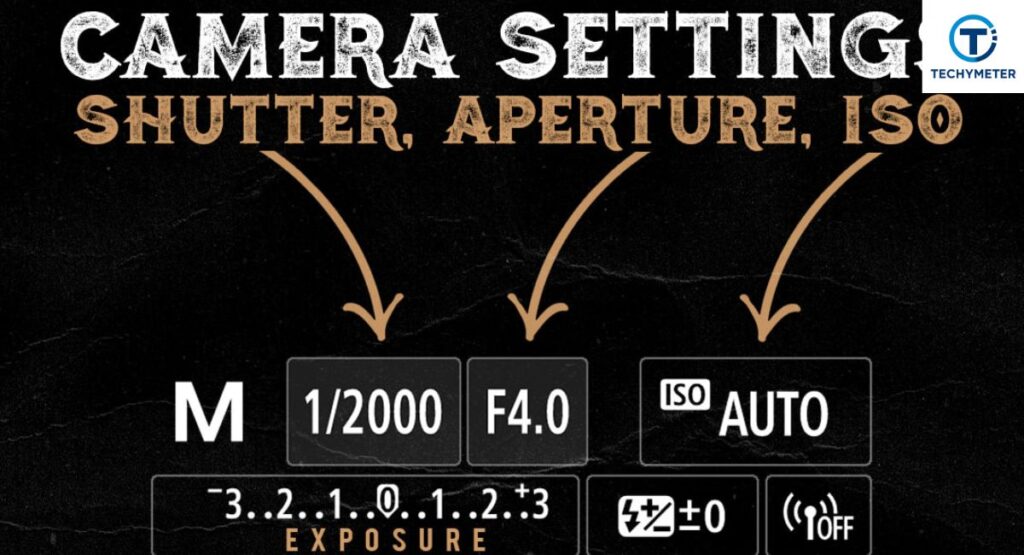
Shooting in Manual Mode (Step-by-Step)
Manual shooting gives you full control over light and creativity. At first, it feels complex. However, once you understand the flow, it becomes natural. Using the right settings for the camera, you can control brightness, blur, and sharpness in every shot.
Think of manual mode like driving a car. You control speed, direction, and timing. With practice, your manual camera settings improve. You start understanding light and mastering how to use manual mode with confidence.
Set aperture
Start by choosing an aperture based on your subject. A wide aperture creates a shallow depth of field and background blur. This helps in getting a blurry background and improves portrait camera settings.
Set shutter speed
Adjust the shutter speed next. Fast speed freezes action while slow speed creates motion blur. This is useful in sports photography settings and creative shots like flowing water.
Adjust ISO
Set ISO based on light conditions. Low ISO gives clean images. High ISO helps in low-light camera settings but may add image noise.
Check the exposure meter
Use the histogram and exposure scale to balance light. This ensures proper exposure without losing highlights or shadows.
Take a test shot
Take a photo and review it. Adjust settings using exposure compensation if needed. This step improves your camera settings for clear pictures.
Aperture Explained
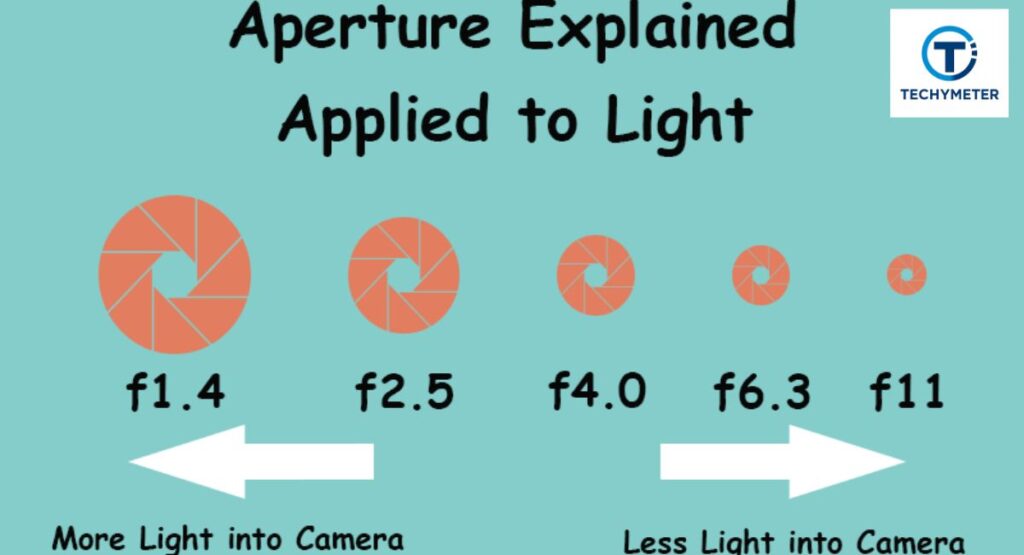
Aperture controls how much light enters the lens. It also affects depth of field, which decides how much of your image is in focus. A wide aperture lets in more light and creates a blurred background.
A small aperture reduces light but keeps more of the scene sharp. This is useful in landscape photography settings. Choosing the right aperture improves your camera settings and overall photo quality.
Shutter Speed Explained
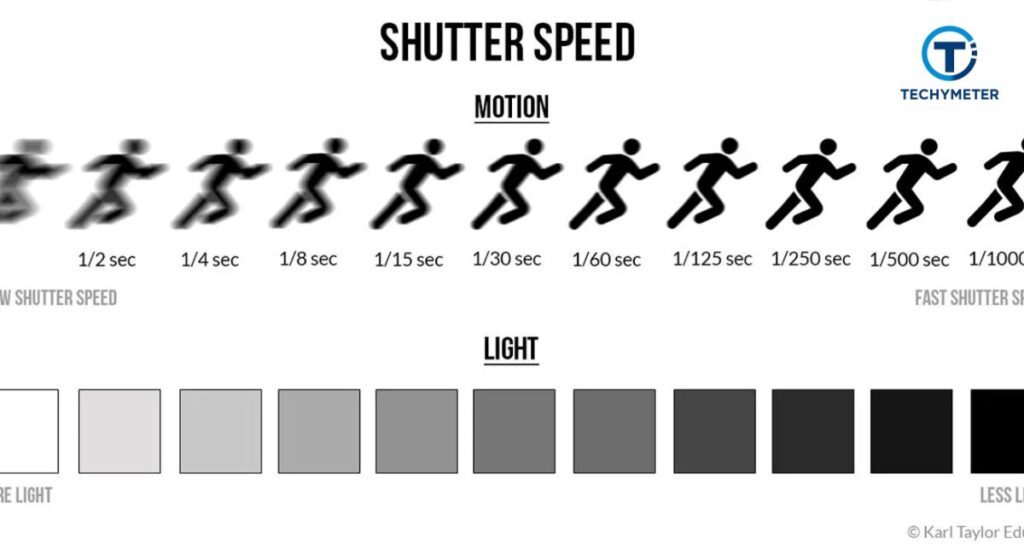
Shutter speed controls how long light hits the camera sensor. A fast shutter captures quick moments. A slow shutter shows movement through motion blur.
For example, fast speeds are perfect for action shots. Slow speeds work well for creative effects. Understanding this helps you master how to freeze motion in photography and improve your best camera settings.
ISO Explained
ISO controls the sensitivity of your camera to light. Low ISO gives clean images with better dynamic range. High ISO makes images brighter but can increase image noise.
In bright daylight, keep ISO low. In dark scenes, increase it carefully. This balance helps in how to shoot in low light and improves your camera settings for sharp photos.
White Balance Explained
White balance settings control the color temperature of your photos. Proper white balance ensures colors look natural under different light sources. Without it, images may look too blue, yellow, or orange. Understanding this improves your camera settings for clear pictures.
For example, use auto white balance for most daylight conditions. Switch to custom settings for indoor lighting or creative effects. Mastering white balance is a key part of manual camera settings and helps in photography basics explained.
Adjusting white balance
Start with auto mode for simplicity. For warmer tones, use tungsten or incandescent settings. For cloudy days, choose cloudy white balance. Correct adjustments enhance skin tones and natural colors in portraits.
Focus Settings Explained
Focus determines sharpness in your images. Choosing the right focus mode affects both still and moving subjects. Use single-point autofocus for portraits and continuous autofocus for action shots. Proper focus improves camera settings for sharp photos and beginner photography settings.
Selecting focus modes
AF-S (single) works for stationary subjects, AF-C (continuous) tracks movement. Eye autofocus ensures sharp faces in portraits. Manual focus gives complete control but requires practice. Knowing when to switch modes helps avoid blurry photos.
Best Camera Settings for Outdoor Photography
Outdoor photography requires adjustments for sunlight, shadows, and weather. Use a moderate aperture to balance depth of field, keep ISO low for clarity, and adjust shutter speed for moving subjects. Correct outdoor camera settings enhance sharpness and reduce image noise.
Optimizing outdoor photos
Bright daylight: ISO 100–200, shutter speed fast, aperture f/8–f/11. Cloudy: open aperture slightly, adjust ISO 200–400. Understanding light helps you capture vibrant and clear outdoor shots while improving camera settings for beginners.
Best Camera Settings for Portrait Photography
Portraits need attention to aperture, shutter speed, and ISO. Wide apertures create blurred backgrounds, emphasizing your subject. Proper ISO keeps skin natural, and an appropriate shutter speed prevents blur. Portraits benefit from understanding the best aperture for portraits.
Portrait tips
Use a single-point AF for the subject’s eyes. Aperture f/1.8–f/2.8 blurs the background. Keep ISO low for smooth skin tones. Adjust the shutter speed depending on movement. These steps improve your camera settings for clear pictures.
Best Camera Settings for Low Light Photography

Shooting in low light requires careful control of ISO sensitivity, shutter speed, and aperture. Open your aperture wide to let in more light, use a slower shutter speed if the subject is still, and increase ISO only as needed to avoid image noise. These are essential low-light camera settings for beginners.
Using a tripod often improves stability and allows longer exposures without blur. Adjust white balance settings for warm indoor lights or cool streetlights. Mastering these controls helps you learn how to shoot in low light while keeping your photos sharp.
Low light tips
ISO 800–1600 works for dim conditions, aperture f/1.8–f/2.8 blurs the background, and shutter speed around 1/60 sec is safe for handheld shots. Use a tripod for slower speeds to prevent motion blur.
Best Camera Settings for Landscape Photography
Landscapes require sharpness and detail throughout the frame. Use a small aperture (f/8–f/16) to increase depth of field, low ISO for minimal image noise, and moderate shutter speed to capture the scene. These are critical landscape photography settings.
Focus on using the exposure triangle to balance light and shadows. A sturdy tripod improves stability, and adjusting manual camera settings allows control over dynamic range. This ensures your landscapes are vivid and clear.
Landscape tips
Use aperture f/11, ISO 100, and shutter speed depending on the light. Check the histogram for proper exposure. Focus one-third into the scene for maximum sharpness.
Best Camera Settings for Sports Photography

Action photography demands speed and accuracy. Use fast shutter speeds to freeze movement, continuous autofocus for tracking, and burst mode to capture multiple frames. These are key sports photography settings.
High ISO may be needed indoors, while bright daylight allows low ISO. Wide apertures create selective focus, and adjusting aperture, shutter speed, and ISO correctly ensures clear, sharp shots. Mastering these techniques teaches how to freeze motion in photography.
Sports tips
Shutter speed 1/500 sec or faster, ISO 400–800 for indoor sports, aperture f/2.8–f/4. Use continuous AF and burst mode for capturing action sequences.
10 Camera Settings You Should Change Right Now
Certain default settings limit photo quality. Adjusting them improves DSLR camera settings, mirrorless camera settings, and overall camera settings for beginners. These settings include auto ISO limits, focus modes, and review time.
Changing these settings creates a personalized workflow. It helps beginners avoid common photography mistakes beginners make and ensures every shot is optimized for camera settings for sharp photos.
Settings to adjust
Adjust auto ISO limits, enable back button focus, customize function buttons, turn on highlight warning, set minimum shutter speed, customize file naming, shorten image review time, enable focus limiter, adjust AF area size, and set auto power off.
FAQs
Best camera settings for beginners
Start with aperture priority, ISO 100–400, and auto white balance settings. Focus on single-point autofocus for clarity. This setup works for most daylight and indoor situations.
How to set up camera settings
Reset the camera, select RAW vs JPEG, set auto white balance, and adjust drive mode. These steps ensure your camera settings guide is ready for practical use.
How to get clear camera quality
Use low ISO, sharp focus, and correct exposure. Adjust aperture and shutter speed according to your subject and lighting to improve camera settings for sharp photos.
How to shoot in manual mode
Set aperture, shutter speed, and ISO sensitivity based on lighting. Check the histogram and use exposure compensation to fine-tune your shot.
Best ISO for beginners
ISO 100–400 works well for daylight. For indoor or low light, increase ISO carefully to avoid image noise.
Best shutter speed for beginners
For still subjects, 1/125 sec works fine. For movement, faster shutter speeds like 1/500 sec freeze action effectively.
Best aperture for portraits
Use f/1.8–f/2.8 for background blur. This improves portrait camera settings and helps you learn how to get a blurry background naturally.
Conclusion
Mastering the settings for camera transforms photography from guesswork into art. By understanding manual camera settings, exposure triangle, and basic adjustments, you gain full control over light, depth of field, and motion blur. Even beginners can achieve professional results.
Practice consistently, use the camera settings guide, and experiment with aperture, shutter speed, ISO, focus, and white balance settings. Over time, these photography tips for beginners help you capture sharper, clearer, and more vibrant photos in every situation, from outdoor landscapes to low-light portraits.
Read More
7 Best Cameras With Bokeh for Stunning Photos (2026 Guide)
7 Proven Camera Settings for Cloudy Day Magic (Complete Guide for Stunning Overcast Photography)
How to Attach a Camera to a Tripod in 10 Easy, Perfect Steps
Best Compact Cameras for Travel in 2026 (No Regrets)
50 Essential Parts of a Camera Every Photographer Must Know