Photography doesn’t always need expensive cameras or complex lenses. A pinhole camera offers a fascinating way to capture images by using a tiny aperture, allowing light to project an inverted image onto film or photographic paper. This simple yet powerful technique enables you to explore the fundamentals of light and image formation, creating unique, soft-focus photographs.
Whether you are a beginner or a photography enthusiast, making your own camera is both fun and educational. The principle behind a pinhole camera dates back centuries to the camera obscura, which artists and scientists used to study light and perspective.
Over time, this concept evolved into practical pinhole photography, inspiring DIY pinhole camera projects and experimental photography techniques worldwide. By constructing a light-proof camera box with a precise pinhole aperture, anyone can produce artistic and scientific images without a traditional lens.
“Learn how to make a pinhole camera, capture stunning images, and explore creative and educational photography using simple lens-free techniques.”
In this guide, you’ll learn about the pinhole camera, from choosing materials to developing and digitizing photos. You’ll also discover pinhole photography tips, common problems, and creative analog techniques.
Pinhole Camera Concept
The pinhole camera concept is built on radical simplicity. A tiny hole replaces a lens. Light travels straight. An image appears slowly. This idea powers pinhole camera photography, experimental photography techniques, and every simple camera without a lens ever made. It strips photography down to its bones.
At its core, this is a low-cost camera experiment that teaches patience. You see how long exposure photography shapes mood. You notice how mistakes teach faster than perfection. This concept is why educators still use pinhole cameras as a pinhole camera science experiment and a hands-on learning tool.
What Exactly Is a Pinhole Camera?
A pinhole camera is a sealed container with one tiny opening. That opening controls light. Inside, film or paper records the image. This makes it a homemade pinhole camera, a handmade camera project, and a pure example of analog photography methods.
Unlike modern gear, this camera forces you to slow down. You learn that holding the camera steady during exposure matters. You see, pinhole camera image quality depends on time, not technology. This is why many artists still choose a pinhole camera without a lens for expressive work.
Basic Definition of a Camera Explained Simply

A camera is any device that captures light and turns it into an image. That’s it. No lens required. This definition explains why pinhole cameras work and why the camera obscura principle still applies today. Light enters. Light records. Light tells a story.
This idea connects basic camera construction to modern tools. Whether you use film or sensors, the rule stays the same. Light must be controlled. Direction matters. That is why pinhole cameras are often used in school pinhole camera project lessons across the USA.
Origin of the Pinhole Camera Idea
The pinhole camera idea came from observing nature. Early scientists noticed that sunlight passing through small gaps formed upside-down images. This observation led to the camera obscura principle, which predates photography by centuries.
Later, artists and scientists refined the idea. Once film existed, images became permanent. That moment gave birth to pinhole photography as an art form. It also shaped film photography basics and influenced modern optical science.
Historical Snapshot Table
| Era | Key Development | Impact |
| Ancient Times | Natural pinhole projections | Discovery of image inversion |
| 18th Century | Camera obscura rooms | Artistic tracing |
| 19th Century | Film introduced | Permanent pinhole images |
| Modern Era | DIY pinhole revival | Education and fine art |
Camera Obscura and Its Scientific Roots
The camera obscura principle explains how light behaves when it passes through a tiny opening. Rays travel in straight lines and cross at the opening, creating inverted image formation on the opposite surface. This simple observation became the backbone of pinhole camera photography and early optical science.
Scientists later realized this effect could teach vision and physics. Long before cameras existed, dark rooms projected outdoor scenes onto walls. That discovery shaped basic camera construction and helped people understand why images flip, answering why pinhole images are inverted even today.
Evolution from Camera Obscura to Pinhole Photography
The shift from projection to capture changed everything. When light-sensitive materials arrived, temporary images became permanent. This evolution gave rise to analog photography methods and eventually the homemade pinhole camera as a creative tool rather than a scientific curiosity.
Artists embraced slow processes. Exposure time replaced speed. Precision replaced automation. This transition explains why pinhole photography values patience. It also explains the rise of long exposure photography, where time itself becomes part of the image.
Early Experiments in Pinhole Imaging
Early pinhole experiments were messy and brilliant. Creators tested boxes, tins, and wood to study pinhole aperture size and brightness. These trials formed the foundation of experimental photography techniques and proved that a simple camera without a lens could still create expressive images.
Many experiments failed. Light leaks ruined film. Exposure times were guessed. Yet these failures taught photographers exposure time calculation and the importance of a light-proof camera box. Trial and error became the teacher, not technology.
Pinhole Cameras in the Film Photography Era
Once film became common, pinhole cameras entered a golden age. In order to manipulate contrast and mood, photographers investigated the fundamentals of film photography, particularly black and white film developing. The pinhole camera became a respected handmade camera project, not a toy.
This era refined techniques like darkroom film processing, negative film scanning, and understanding ASA film speed basics. These practices still guide modern pinhole artists and help beginners choose the best film for pinhole photography.
Film Era Insight Table
| Element | Role in Pinhole Photography | Learning Outcome |
| Film Speed | Controls sensitivity | Exposure accuracy |
| Chemicals | Reveal image | Image permanence |
| Darkness | Prevents damage | Avoiding errors |
| Time | Shapes results | Creative control |
Principle of a Pinhole Camera
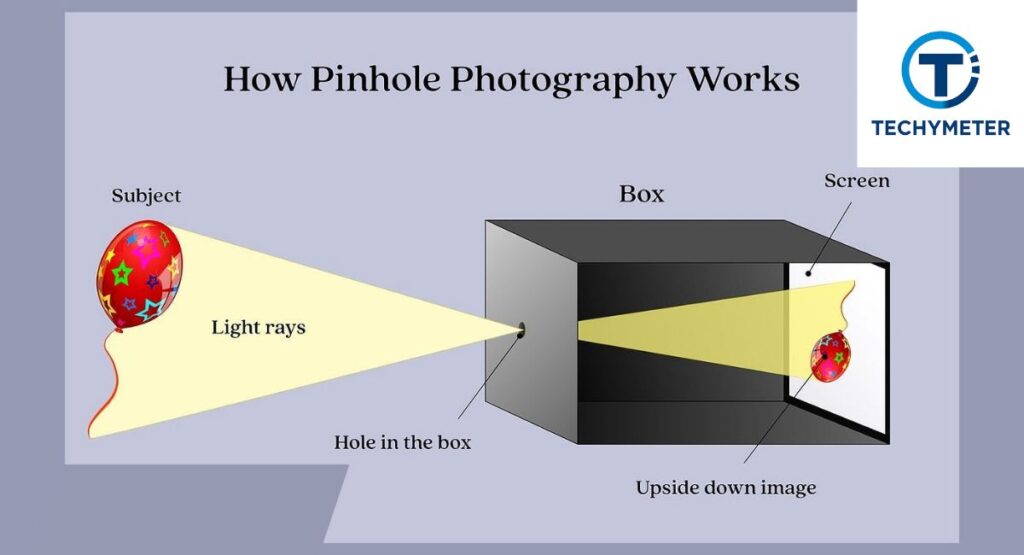
The principle behind a pinhole camera is simple but powerful. Light travels in straight lines. When it passes through a tiny hole, it projects a scene inside a dark space. This is how a pinhole camera works without glass or electronics.
Because there is no lens, every part of the scene stays in focus. This makes pinhole camera without lens designs unique. The image may look soft, but it carries depth, mood, and realism that modern cameras often remove.
How a Pinhole Camera Works Step by Step
A pinhole camera works by controlling light entry and time. Light enters through a tiny hole, hits film or paper, and forms an image. This slow process explains how long exposure a pinhole camera needs in bright or low light.
The camera stays closed most of the time. Opening it briefly acts as a pinhole shutter mechanism. Understanding this helps beginners master holding the camera steady during exposure, which is critical in long exposure photography.
Why are Images inverted in a Pinhole Camera?
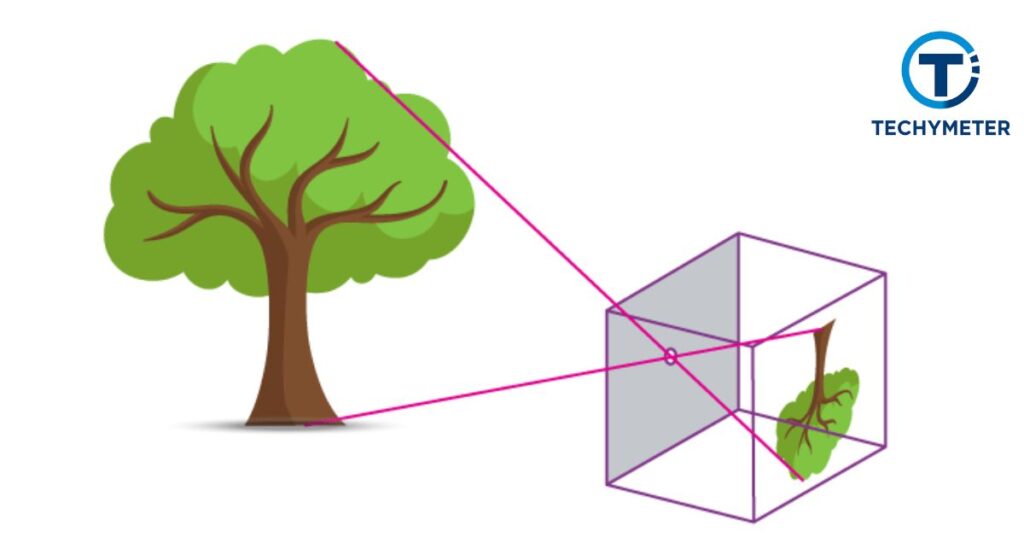
Images appear upside down because light rays cross at the pinhole. Light from the top of a subject hits the bottom of the film. Light from the bottom reaches the top. This explains why pinhole images are inverted in every setup.
This effect is not a flaw. It is physics. The same inverted image formation happens in your eyes and in digital sensors. Understanding this builds confidence and turns a pinhole camera science experiment into real photographic knowledge.
Image Characteristics Produced by a Pinhole Camera
Pinhole images look different from lens photos. They are softer, deeper, and timeless. This defines pinhole camera image quality, where sharp edges are replaced by gentle transitions and natural vignetting.
Because exposure takes longer, moving objects blur. Still objects glow. This makes pinhole photography ideal for shooting still life with a pinhole camera and long exposure portrait photography, where time becomes part of the image itself.
Image Characteristics Comparison Table
| Feature | Pinhole Camera | Lens Camera |
| Focus | Infinite | Adjustable |
| Sharpness | Soft | Sharp |
| Exposure | Long | Short |
| Mood | Artistic | Technical |
Construction Basics of a Pinhole Camera
A pinhole camera starts with basic camera construction. You need a sealed container that blocks all light except one tiny opening. This box becomes a light-proof camera box where images slowly form using time and patience.
Most beginners use a cardboard pinhole camera because it is cheap and easy to shape. The goal is simple. Create darkness inside. Control the light outside. This foundation makes any DIY pinhole camera project successful.
Choosing the Right Pinhole Size
Pinhole size controls sharpness and exposure. A hole too large creates blur. A hole too small causes dim images. Choosing the correct pinhole aperture size is the most important design decision.
Most homemade pinhole camera builders use thin metal for accuracy. An aluminum foil pinhole works well because it allows precise control. This balance improves clarity and reduces failed photos.
Understanding Optimal Pinhole Diameter
The optimal pinhole diameter depends on camera depth. A deeper box needs a slightly larger hole. This improves brightness while protecting detail. This balance defines true pinhole camera photography quality.
A common formula helps beginners. Diameter equals the square root of focal length multiplied by a constant. This method guides making a pinhole lens with a needle more accurately than guessing.
Calculating f-Number and Exposure Time
The f-number is focal length divided by pinhole size. Pinhole cameras often reach f/150 or higher. This explains how long exposure a pinhole camera needs in normal daylight.
Long exposure is unavoidable. This is where exposure time calculation matters. Understanding light levels prevents overexposed pinhole photos and reduces underexposed pinhole images during testing.
Exposure Reference Table (Daylight Conditions)
| Pinhole f-Number | Typical Exposure Time |
| f/150 | 5–10 seconds |
| f/200 | 10–20 seconds |
| f/250 | 20–40 seconds |
Natural Pinhole Phenomenon in Daily Life
The natural pinhole phenomenon appears when sunlight passes through tiny gaps, like leaves or a window screen, forming multiple images. This is how a pinhole camera works naturally and can inspire low-cost camera experiments.
Understanding this helps beginners see how light travels in straight lines, creating inverted image formation even without a lens. Observing sunlight on a sunny day can teach much about experimental photography techniques.
Materials Required to Make a Pinhole Camera
To start a homemade pinhole camera, gather a light-proof camera box, black paper, an aluminum foil pinhole, a sharp needle, scissors, tape, and film or photographic paper. Optional tools include a ruler and rubber bands for stability.
These pinhole camera materials are inexpensive. Beginners often use cardboard pinhole camera designs, which make a simple camera without a lens. Choosing the right materials ensures better pinhole camera image quality.
Step-by-Step Guide to Making a Pinhole Camera
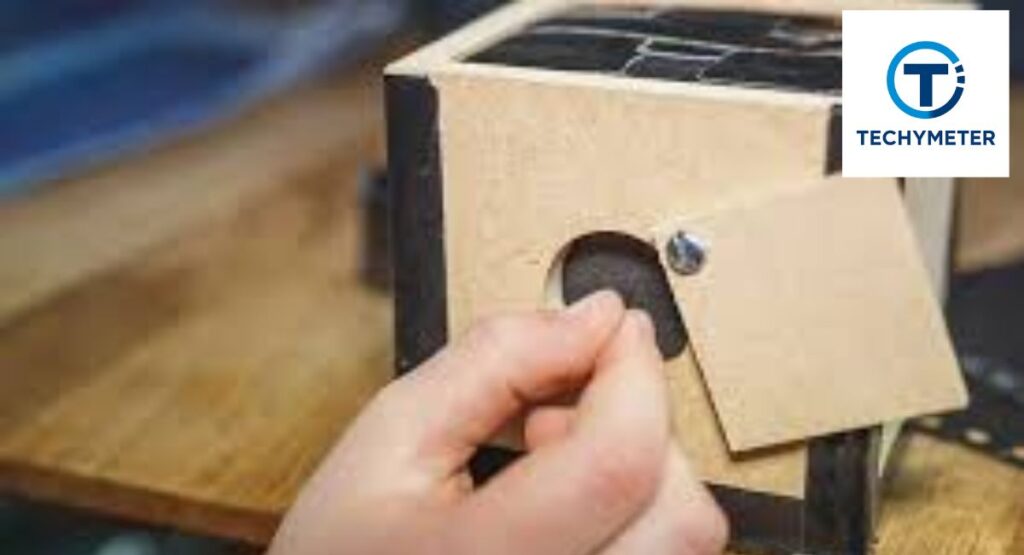
Start by creating a light-tight camera box. Line it with black paper to reduce reflections. Cut a small square and tape aluminum foil over it. Pierce the foil with a needle, making a precise pinhole lens.
Secure the box lid and design a pinhole camera shutter for controlled exposure. These steps to build a pinhole camera are essential for preventing light leaks in photography and preparing for long exposure shots.
Loading Film or Paper into a Pinhole Camera
Loading requires care. Insert film or photographic paper exposure inside the camera. Tape it to the sides to avoid movement. This step teaches beginners taping film inside the camera and advancing film manually for multiple shots.
Always perform this in a dark room or a blackout bag. This prevents foggy film and ensures images are not ruined by accidental light. Proper loading is the first step in successful DIY pinhole camera projects.
Materials & Steps Table
| Step | Material | Purpose |
| Line Box | Black Paper | Reduce light reflection |
| Create Pinhole | Aluminum Foil & Needle | Forms the lens |
| Secure Film | Tape | Keeps film flat |
| Shutter | Cardboard/Wood | Control exposure |
| Darkroom | Bag/Room | Prevent foggy film |
How to Take Photos Using a Pinhole Camera
Taking photos with a pinhole camera requires patience. Open the pinhole camera shutter design to expose the film. Hold the camera still using a tripod or a weight. This is essential for long exposure photography and avoids blurry results.
Begin experimenting with exposure times. Experimenting with exposure times helps you learn how long an exposure a pinhole camera needs in different lighting. Start with 5–10 seconds in bright sunlight, and adjust for indoor or cloudy conditions.
Developing and Processing Pinhole Photographs
Once your film is exposed, it’s time to develop the film at home. Mix film developing chemicals, including developer, stop, and fixer. Pour developer into the tank, then stop, then fix. This is a mixing developer stop and fixer for black and white film developing.
After processing, carefully hang the negatives to dry. This step teaches drying photographic negatives and prevents scratches. You can then scan your negatives for digital use, which involves scanning film negatives and digitizing analog photos.
Common Pinhole Camera Problems and Solutions
Beginners often face common pinhole camera problems like overexposed pinhole photos, underexposed pinhole images, or foggy film. Light leaks can ruin images, while unstable cameras blur shots.
Securing the shutter, utilizing a light-proof camera enclosure, and practicing maintaining camera stability throughout exposure are some solutions. Recording exposure times and testing different pinhole sizes reduces repeated errors, making pinhole camera photography more consistent.
Practical Tips for Better Pinhole Photography
Patience is key in pinhole photography tips. Always check for light leaks and ensure film or paper is flat. Experiment with subjects like shooting still life with a pinhole camera or long exposure portrait photography to improve your skills.
Use simple tools like cardboard or tape to create precise pinhole shutter mechanism designs. Small adjustments to pinhole diameter and exposure help achieve the best pinhole camera image quality and successful DIY pinhole camera projects.
Common Pinhole Camera Problems & Fixes
| Problem | Cause | Fix |
| Foggy film | Light leaks | Seal all edges, use darkroom |
| Overexposed | Too long exposure | Reduce the exposure time calculation |
| Underexposed | Too short exposure | Increase exposure time |
| Blurry | Camera shake | Use a tripod or a weight |
| Inverted image | Normal physics | Understand why pinhole images are inverted |
Using a Pinhole Technique with Digital Cameras
The pinhole camera technique can be applied to digital cameras, too. Remove the lens and create a tiny pinhole aperture using aluminum foil or tape. This allows you to experiment with simple camera without lens methods on modern devices.
Digital setups make long exposure photography easier. You can instantly check results and tweak exposure times. This combination of analog photography methods and digital convenience bridges classic techniques with today’s technology.
Creative Uses of Pinhole Cameras
Pinhole cameras are excellent for creative photography. You can experiment with still life setups, architectural shots, or long exposure portrait photography. The soft, dreamlike quality of pinhole camera photography adds unique artistic effects.
Artists and students often use DIY pinhole camera projects in workshops or school experiments. These cameras are low-cost, perfect for school pinhole camera projects, and help teach the camera obscura principle in a hands-on way.
Advantages of Using a Pinhole Camera
Pinhole cameras offer unmatched simplicity. They are inexpensive, lightweight, and safe for low-cost camera experiments. With no lens, they reduce distortion, and the inverted image formation introduces an educational element for beginners.
They also encourage patience and creativity. Experimental photography techniques like long exposures or unusual angles are easier to try. Beginners can explore film photography basics without expensive equipment or complicated settings.
Limitations and Disadvantages of Pinhole Cameras
While artistic, pinhole cameras have drawbacks. Exposure times are long, so fast action shots are impossible. Pinhole camera image quality is lower than lens-based cameras. Film requires careful handling and darkroom film processing knowledge.
You may also face light leaks in photography, underexposed images, or unpredictable results. For daily use, pinhole cameras are impractical compared to digital cameras, but they remain ideal for DIY pinhole camera projects, education, and creative experiments.
Advantages vs Limitations Table
| Advantages | Limitations |
| Low-cost & easy to build | Long exposure times |
| No lens distortion | Lower image resolution |
| Teaches photography basics | Requires careful handling |
| Encourages creativity | Unsuitable for fast-moving subjects |
| Ideal for experiments | Needs film developing chemicals or a digital adaptation |
Difference Between a Pinhole Camera and a Lens Camera
A pinhole camera differs from a lens camera because it uses a tiny pinhole aperture instead of glass optics. This creates inverted image formation naturally, while lens cameras focus light to produce sharper images. Film photography basics still apply to both, but pinhole cameras are slower and simpler.
While DIY pinhole camera projects teach patience and the principles of light travel, lens cameras enable adjustable focus, zoom, and faster exposures. This makes pinhole cameras perfect for learning basic camera construction and experimenting with exposure times.
Pinhole Camera vs Digital Camera
Compared to digital cameras, pinhole camera photography is entirely manual and analog. Digital cameras automatically adjust ISO, shutter speed, and aperture, while pinhole cameras rely on exposure time calculation and holding the camera steady during exposure.
The results from a pinhole camera are soft, artistic, and low-resolution, unlike crisp digital images. Using a homemade pinhole camera teaches control, patience, and understanding of analog photography methods, whereas digital cameras focus on convenience and speed.
Camera Obscura vs Pinhole Camera Explained
The camera obscura principle is the foundation of all pinhole cameras. A darkened room or box projects an inverted image through a small hole onto a surface, which is exactly how a pinhole camera without a lens works.
Pinhole cameras are essentially portable camera obscura devices with recording ability using film or photographic paper. They allow hands-on experience with school pinhole camera projects and pinhole photography tips for beginners learning the science of light and images.
Similarities Between Pinhole and Digital Cameras
Despite differences, pinhole and digital cameras share core principles. Both capture light to record an image, require holding the camera steady during exposure, and need careful composition. Exposure control, whether via time in pinhole cameras or settings in digital cameras, determines image quality.
Both types benefit from experimenting with angles, light, and subject matter. Using a pinhole technique with digital cameras combines old-school methods with modern convenience, highlighting the value of experimental photography techniques for creative results.
Pinhole vs Lens & Digital Cameras
| Feature | Pinhole Camera | Lens Camera | Digital Camera |
| Lens | No | Yes | Yes |
| Image sharpness | Soft | Sharp | Sharp |
| Exposure | Long | Fast | Adjustable |
| Learning curve | High | Moderate | Low |
| Cost | Low | Medium-High | High |
| Creativity | High | Moderate | Moderate |
Pinhole Cameras and Hidden Camera Misconceptions
Some people confuse pinhole cameras with hidden surveillance devices. While they share the small pinhole aperture, homemade pinhole cameras are meant for creative or educational photography, not spying. The focus is on experimental photography techniques, learning about light, and understanding analog photography methods.
Misconceptions often arise because of the tiny size of the lens opening. By educating beginners, you show that a pinhole camera without a lens is a tool for art and science, not secrecy. Schools often use these devices for pinhole camera science experiments safely and legally.
Famous Photographers Known for Pinhole Photography
Pinhole photography has inspired many artists. Justin Quinell, for example, has elevated pinhole camera photography to professional art levels. He explores long exposure photography and unusual angles that only DIY pinhole camera projects can achieve.
Other photographers use cardboard pinhole camera setups or aluminum foil pinhole designs to create dreamy, soft-focus images. Their work demonstrates the versatility of simple camera without lens methods and inspires beginners to experiment with school pinhole camera projects and handmade camera projects.
Educational and Scientific Uses of Pinhole Cameras
Pinhole cameras are ideal for schools and science labs. They teach the camera obscura principle, basic camera construction, and inverted image formation interactively. Students have practical experience with darkroom film processing, photographic paper exposure, and the fundamentals of film photography.
These cameras are excellent for experiments in optics and light. Using a pinhole shutter mechanism and exposure time calculation, students can test concepts practically. School pinhole camera projects also foster creativity while reinforcing scientific learning.
Final Thoughts
Creating a pinhole camera combines science, art, and patience. From how to make a pinhole camera to scanning film negatives, this hands-on approach teaches both experimental photography techniques and analog photography methods.
Whether for a DIY pinhole camera project, a school pinhole camera project, or personal artistic exploration, the process emphasizes creativity, patience, and understanding of light. By experimenting with exposure, materials, and subjects, anyone can capture unique images, learning the magic behind simple camera without lens techniques.
Summary Table: Pinhole Camera Essentials
| Aspect | Key Points |
| Core Principle | Camera obscura principle and inverted image formation |
| Materials | Cardboard pinhole camera, aluminum foil pinhole, black tape, film |
| Process | Steps to build a pinhole camera, loading film into a pinhole camera, and developing film at home |
| Tips | Avoid light leaks, hold the camera steady, and experiment with exposure |
| Creative Uses | Shooting still life with a pinhole camera, long exposure portraits, and experimental art |
Conclusion
A pinhole camera is a simple yet fascinating tool that combines science, art, and creativity. By understanding how a pinhole camera works, you can explore analog photography methods, experiment with exposure time calculation, and produce unique, soft-focus images.
From DIY pinhole camera projects to school pinhole camera experiments, it teaches patience, precision, and the fundamentals of light and image formation. Whether you use photographic paper or film, follow the steps to build a pinhole camera and develop it at home; the process enhances both your technical knowledge and artistic vision.
Learning to avoid light leaks, mastering the pinhole shutter mechanism, and experimenting with long exposure photography make every shot a rewarding experience. Ultimately, a pinhole camera is not just a simple camera without a lens, but a gateway into the world of creative and experimental photography.
FAQs
1. What is a pinhole camera used for?
A pinhole camera is used for capturing images without a lens, often for artistic or educational purposes. It demonstrates the basic principles of light and image formation.
2. What is a pinhole camera, class 6 short answer?
A pinhole camera is a simple box with a tiny hole that projects an inverted image on the opposite side. It teaches how light travels in straight lines.
3. How to make a pinhole camera image?
Place photographic film or paper inside a light-proof box with a pinhole. Light passing through the hole forms an inverted image on the film or paper.
4. How does a pinhole camera work step by step?
Light enters a tiny pinhole and projects an inverted image onto the back of a light-proof box. Film or paper records the image, which can be developed or scanned.
5. What size pinhole is best?
The best pinhole size depends on the distance to the film; usually around 0.2 to 0.5 mm for small homemade cameras. It balances sharpness and brightness.
6. What is the working principle of a camera?
A camera works by letting light enter through an aperture to form an image on film or a sensor. It captures the intensity and color of light to record photos.
7. How long does a pinhole photo take?
Exposure time can vary from a few seconds to several minutes, depending on light conditions. Indoor or cloudy scenes need longer exposures.
8. What is another name for a pinhole camera?
It is also called a “Camera Obscura”, which means a darkened room or box projecting an image through a small hole.
9. What are the different types of pinholes?
Types include single pinhole, multiple pinhole, and adjustable pinhole designs. They differ in size, shape, and material.
10. How many holes does a pinhole camera have?
A standard pinhole camera has one tiny hole through which light passes. Some experimental designs may use multiple pinholes for creative effects.
Read More
Gully Camera – The Ultimate Solution for Drain & Sewer Inspections
Everything About DSLR Cameras: Types, Features, and Tips
PTZ Cameras in Modern Security: Why Pan-Tilt-Zoom Tech Changes Everything
Best Veo Camera Alternatives for Football and Soccer Clubs